Workshop 1-2
You will find and download an image from the internet.
This image will be a portrait of a famous person.
Make sure that the image is frontal, cropped to the face, and not tilted.
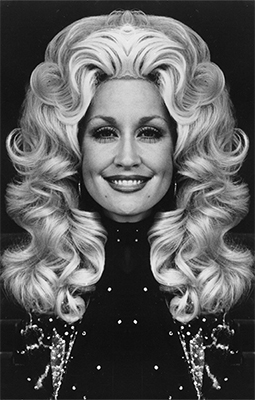 Dolly Parton
Symmetrical Image:
Search the internet - Google Image Search:
- Search for a portrait of a celebrity. (you can also refine the search for "celebrity headshot")
Make the search "noncommerical reuse with modification" - Find an image that is more than 600px in the height.
- Make sure that the face is straight forward, not tilted, and that there is no cropping (specifically any part of the face or hair). Color works best, but you can also use black&white.
- Save images (either your removable media or the Student Drive): Create a folder "lastname_workshop1-2, then a sub-folder named "assets". Place images that you intend to use in the assets folder. Edited psd files will be saved in the root location - I'll explain this)
Open in Photoshop:
- Open the downloaded image from Bridge (double-click)
- Save As: lastname1_workshop1-2.psd (layers will be intact)
into new folder: lastname_workshop1-2 - Click the "background layer" lock icon / Double-Click "background, rename "original"
- Choose the Crop Tool (C) and see if you need to straighten or crop in the image at all. You might need to turn "snap" off under Menu Bar > View, or shift cmd ;
Make sure that "delete cropped pixels" is checked in the option bar
Drag your crop, hit return to apply your crop - Choose the Move tool (V)
- Menu Bar > Show > Rulers (cmd R), Change units to pixels (or double-click ruler for more preferences)
- Drag a Guide from the Ruler and position to the vertical center of the face
- Choose the Crop tool - make sure the "delete cropped pixels" is still checked in the option bar
- Drag a vertical side and allow to snap to the guide (make sure snapping is ON)
- Menu Bar > Image > Canvas Size
Relative (check box), Width: 100%
And click the grid based on which side you cropped (will demo this in class). This will extend the workable canvas in a chosen direction. - Copy the layer (cmd j) - OR - Move Tool & option/drag (this moves AND copies)
- Transform (cmd t), Cntrl-click (or right click), choose "flip horizontal"
- Make sure that you have Moved the layer into the spot (either left or right of the original layer)
- SAVE
When you have completed the first face, REPEAT and do the whole process again with a new celebrity's face.
You will have 2 psd files.
Pixelate / Blur >
- With the first psd open, SAVE AS: lastname1_blur_workshop1-2.psd
- Merge Down the Top Layer to the Bottom Layer (the quick key is CMD E)
- Name this Layer "original"
- Copy the Layer (drag to the paper icon in the panel) Convert the layer using Menu Bar > Filter > Pixelate > Mosaic.
(find the point where you just begin to lose the image to abstraction). Name this layer "mosaic". - Copy the Mosaic layer (CMD J) and use Stylize > Find Edges. Change the blend mode to Multiply. Lower the Opacity.
Name this layer "find edges". - Turn Visibility OFF on the Mosaic and Find Edges Layers
- Copy the Original layer, Rename "blur"
Menu Bar > Convert to Smart Filter
Menu Bar > Filter > Blur > Gaussian Blur. - Layer Comps - Create 2 different Blend Mode, Opacity, and Layer Order choices
I've found that the layer order works best as top down: find edges, mosaic, blur, and then the original layer (with visibility turned off).
Experiment and create 2 variations of: layer order, blend modes and opacity settings. - Zoom the image out and see how as a thumbnail the image looks "normal". (this is merely to test your image)
- Complete this process to your 2nd Symmetrical Image
Back-Up
Use your Removable Media (USB drive)
How to Save Work:
folder:
lastname_workshop1-2
image:
lastname1_workshop1-2.psd
lastname2_workshop1-2.psd
lastname1_blur_workshop1-2.psd
lastname2_blur_workshop1-2.psd
sub-folder:
assets
(place all original files that you use in this folder)
///////////////////////////////////////////////////////////////////////////////////////////////////////////////////////////////////////////////////////////////////////////////
Pixel Lecture
Link to the power point Lecture
Artist Links:
Georges Seurat - interesting interactive interface
Vuk Cosic - ascii Moving Images / ascii History of Art for the Blind
Vik Muniz
Ian Wright
Melvin Galapon
Troika - Hardcoded Memory
Daniel Rozin
Bitforms Gallery
Text References (this is NOT required reading):
M.E. Chevreul, "The Principles of Harmony and Contrast of Colours", 1855.
Leon Harmon, "The Recognition of Faces" 1973. (if you subscribe to Scientific American)